Sunday, January 27, 2013

kitty face pillow tutorial

I've finally plucked up enough courage to write my first tutorial!  I know when I read other crafty blogs I love looking and trying their tutorials.  So it's time I share, and once I get the hang of how to do it properly for others to understand I will not be able to stop myself from writing more!

I made this kitty pillow present for a 1 year old kitty themed birthday party, it was sooo cute!


The pattern pieces are basically circles, triangles, and rectangles, it should be fairly easy finding household objects to trace things around to find these shapes.  That can be part of the fun sometimes!


 Let's begin with the face part of the kitty, I chose to make a round face, you could make an oval or triangle one too.  1. & 2.  I found a round pillow. traced around it, and cut 2 pieces making the kitty face slightly bigger than I wanted (for my seam allowance).  3. Make sure there are no pillow thieves when you are in the middle of cutting your circle out.  4. Get your top piece ready to sew eyes to.  5.  Cut out 2 white ovals, and 2 black ovals for the eyes. 6.  Dressmaking pins vs. smaller pins (quilting pins)  they are easier to use to pin smaller things.  7. Pin your eyes in place and whip stitch around with white thread.  Do the same for the black ovals on the white part of the eye. 8.  Embroider some eyebrows if you want!  9. Cut out a triangle for the nose, and stitch a mouth on under in the shape of two "J"'s back to back.


10. Next, cut out 2 triangles of kitty fabric and 2 triangles of contrasting fabric for the inside of the ears. 11. Pin 1 kitty fabric and 1 contrasting fabric right sides together.  12. Repeat with other set. 13. Sew from the bottom to the tip of the triangle then back down leaving the bottom open.  14.  To get nice crisp points trim away to 1/8" away from the seam right at the tip of the ear.  15.  Turn inside out and pin contrasting fabric side down to the face.


16.  Measure around the face to know how long your gusset will be.  Mine was 51" so I added 1" for seam allowance.  I ended up cutting a piece measuring 52"x 3". 17-19. Pin and sew your gusset to the circle face easing the fabric in as necessary.  20.  When you come back the the start of the gusset, come as close as you can to the start.  Backstich and take it out of the machine. 22. (oops no 21.) stitch the gusset closed creating a continuous piece. Trim off excess.  If you are more accurate in your measuring you will not have to trim off any excess, and easing the gusset in will be easier! 23. Sew the gusset seam down.  Repeat steps 17-19 sewing the back side of the kitty face to the other edge of the gusset. I finished mine off by serging but that isn't necessary.  24. Clip the inside where the ears are so the circle can be nice and round and not all bunched up (due to thicker fabric) 25.  Make sure you leave an opening so you turn the pillow inside out and stuff your kitty!  Stuff the pillow until the face is nice and smooth.  Sew the opening shut by using a blind stitch, or a whip stitch.

Ta-da!  Place in a cozy corner and watch your little ones enjoy!


Wednesday, January 23, 2013

Better Than a Pom-Pom

Pom-poms are everywhere these days, on super crafty blogs, pinterest, covers of magazines and on DIY tutorials.  If you don't know how to make a pom-pom all you have to do is google "diy pom-pom" and a plethora of tutorials will come up, some using special tools others just using your hand or a piece of cardboard.  That's why I didn't make my own tutorial, because there are a billion others out there...but maybe that's not a good enough reason. 

One thing I have discovered that is better than a pom-pom, is a multicolored pom-pom!  Seriously, way better.  I bought a simple gray hat from a thrift store, and fancied it up by adding a colorful pom-pom.  I used 3 colors of merino wool and some novelty yarn and it brightened up this little hat!

January can be a dull month for putting fresh cut plants/flowers in your house as there is not much to choose from this time of year.  I found some branches on a walk to the park and put them in a vase with 3 pom poms, and it added some much needed greenery and color to my kitchen.


Tuesday, January 22, 2013

Softie kind of day

When the idea of making soft toys/stuffies/softies/plush toys first caught my imagination, I knew exactly what I wanted to design first.  I enjoy watching Japanese animation and loved the character JiJi.  I love her exaggerated features and personalty.  This is the first softie I designed and sewed about 4 years ago.  Up till now I haven't designed toys seriously but enjoy dabbling in it here and there.  This year however I do plan on it being my main focus (hopefully).  Toys are really fun and satisfying to sew and they can be enjoyed by all ages, that might be the reason I like it most.  Everyone had that favorite comfort toy growing up and can relate to the importance of having a special soft something to embrace when things get tough!


If your thinking of getting into doing toy designing it's fun to look around for inspiration.  Here are a couple crafty blogs that focus, or have focused on handmade toys, enjoy!

placed in the order in which I discovered each designer:

loobylu (specifically her bunnies)

wee wonderfuls

abby glassenberg design

mmmcrafts


Want to make a soft toy and don't know where to begin? Here is a simple design you can make to give to others.  Check out the giving bunny project and maybe you will get addicted to sewing toys too!


Monday, January 21, 2013

The things we like to do

I was having a conversation with a friend, about our mutual friend Becca, who writes the most amazing blog.  We couldn't get over each of her wonderfully worded thought provoking, thoughtful and really well written entries.  How does she have time to write like this?  It came down to priorities.  High on Becca's priority list would be writing.  And that is how she has time during her hectic life to put beautiful words down on paper.

She asked me once how I have time to create and sew I didn't have an answer at the time but thinking about it now, my answer would be priority.  Creating and sewing is near the top of my priority list.  Mostly because I love it.  And it makes me happy.  Eventually, I would love some of the answer to be that it makes me money!  But that is not the current reason.

So everyday I make things, out of habit now, between cleaning, visiting, feeding, changing and a list of other things, I make time to create.  During the day I put off things like doing the dishes, sweeping and reducing clutter which allows me to have more time during the day to create but sometimes only an hour before my husband comes home I am in a mad panic to clean up!  So maybe tidying should get bumped up the list a little bit.

And this is how in the midst of trying to keep the members of my family happy and keep my house clean I have time to sew.

Starting this past autumn I have been working on these little mice, and this week I have put them in the shop!  It's very exiting to me because I love these little mice and I want to share them with you!


Friday, January 11, 2013

A Christmas Dress

On theme with yesterdays post, I made a baby dress from a beautiful curtain I was gifted.  I started making myself a dress out of it in the summer but ran out of time.  So with the remaining piece, I made a Christmas dress for my daughter! I love the colors and the damask print of course!


I used this vintage pattern that I got on one of my thrifting adventures (the one on the left)

Some great advice I once read about sewing from vintage patterns is: make sure all the pieces are there before you cut it out.  This pattern was complete, so that made me happy!


cute little pocket can hold a mini golden book


I've been saving these rienstone buttons for 
a special project like this


Thursday, January 10, 2013

Making out of Necessity

As I was crocheting some dishcloths for my own use,  I felt rather old fashioned.  The idea of making things out of necessity seems quite foreign to me and possibly even this generation.  We make because we like to in this North American handmade revolution not because we have to.


I love these small cloths, and love the colors!


In my fashion history course in university, I did a project on war time rations, specifically clothing and fabric, and making do with what you already had.  It was pretty eye opening that people had to do certain things to make it though those tough years.

With this new trend or fad or whatever you want to call it; "upcycling" a word which our parents hardly understand let alone our grandparents.  Recycling was something that was just part of life for our previous generations, it wasn't merely a trend to be eco-friendly.  I agree that it is the right thing to do, making new things from old things, something which a clothing company founded in Toronto have been doing for years.  Pre-loved in my mind a pioneer in the recycling clothing business, they took what was our garbage and leftovers and turned it into a successful fashion brand.

In 2009 I worked for a non-profit organization trying to "solve" the problem of discarded clothing and what to do with it.  Thrift stores would sort through what they wanted or what they could sell, and the rest would come through our warehouse and out the back door onto a semi trailer.  Some of it was damaged clothing or had bleach stains or was out of "style", but most of it was still in fine working condition.  Why did it end up on a semi trailer?  (consumerism maybe?) That's a bigger question for another time though.

We would fill up a trailer once a week with heaps and heaps of garbage bags of clothing.  Some of it would pass through my hands, and my co-workers hands, and we would make things out of it.  So I do fall under the category of being eco-friendly I guess, or maybe I was trying to help with a bigger problem.

Here are some picture of the masses of clothing that come in each day.


This might have go you thinking, it has got me thinking again maybe we have to be socially responsible, live with what we have, mend and make do like our grandmothers did.  Shop at thrift stores instead of buying in to the consumerism mentality of getting a new wardrobe every season.  I know there are a ton of books at the library on how to make clothing and household decor out of clothing you may already have and be tempted to take to the thrift store, instead take a look at some of these books to get inspired!

Here are a few:

 Sewing Green by Betz White

The Sweater Chop Shop by Crispina Ffrench

Handmade Home by Amanda Soule

We made lots of things out of the refuse that would come in; leather bags, wool purses, reusable shopping bags, and pictured below, something that has been going on for years at this organization, weaving rugs out of denim.


My co-worker from this job is making cute baby booties out of discarded leather coats!  Check out her online store!


Wednesday, January 9, 2013

To Romania with Love

I have a dear friend who lives in Romania, my family met her while we were living in England back in 2003-2005.  She is the most talented seamstress I know, she would make the most beautiful garments completely without a pattern.  Each garment fit perfectly, and the finishing was immaculate.

Eight years later, she now lives back in Romania, and we are in Canada, living our own lives.
My sister and I decided to send a package to her and her family. I made this mouse for her 4 year old daughter.


I thought this little mouse needed a traveling 
cloak so I hand stitched one out of felt with a ribbon closure


Wednesday, January 2, 2013

Picture List

I don't know about you, but sometimes making lists can be discouraging...looking at all of the things that need to get done.  So I thought of a fun and inspiring way to write a list that I actually want to look at everyday!

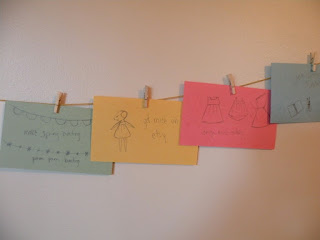
I love 3"x5" index cards, and I always seem to find them at thrift stores, so that's what I used for this project.   Other things you will need for this project are pins, and string of some sort.  I used waxed linen thread because I like the color and how durable it is.


write down all of the things on your list, and add 
an illustration


push your pins into the wall and tie string across the length
 
next, hang up each list item using a small clothespin, you 
could also use decorative tape or paperclips
whatever you have on hand!


ta da! now you have a pretty list!


Make a list for whatever you need or want to do.  Maybe you have a bunch or recipe's to try out or a pile of books to get through, making a visual list is not only helpful but pretty!


Related Posts Plugin for WordPress, Blogger...